Retro-Gaming so einfach wie noch nie!
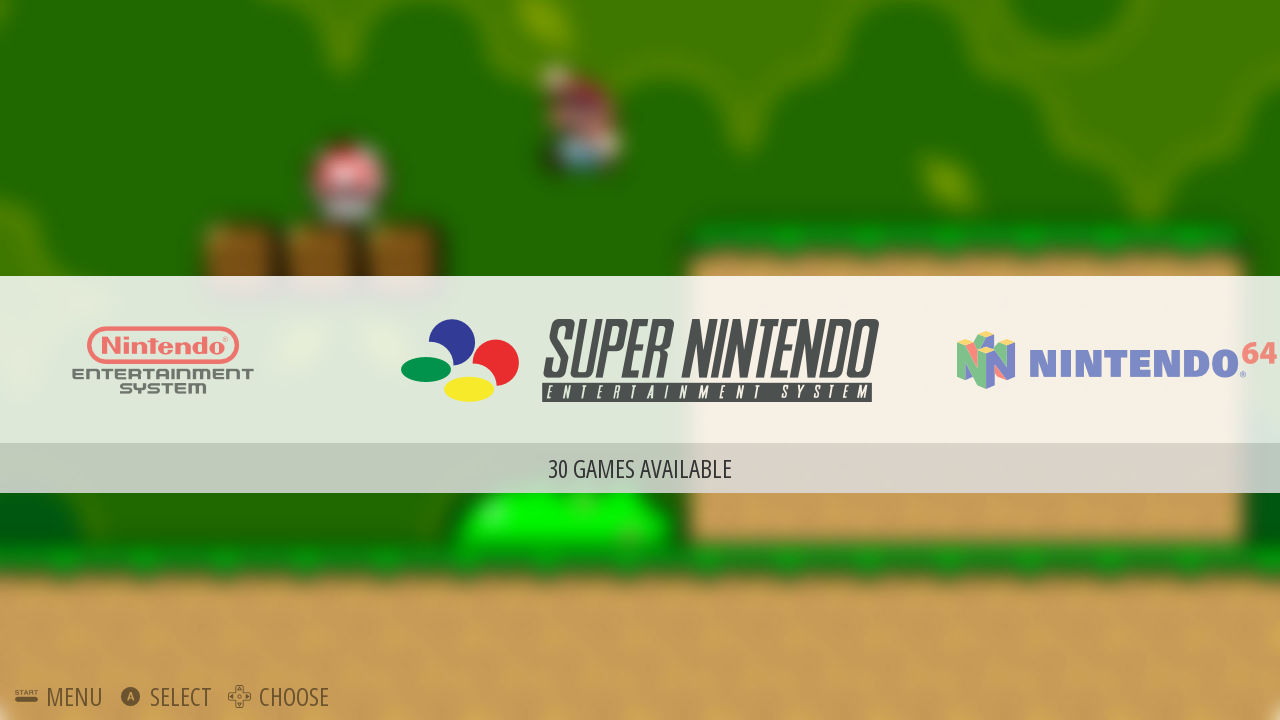
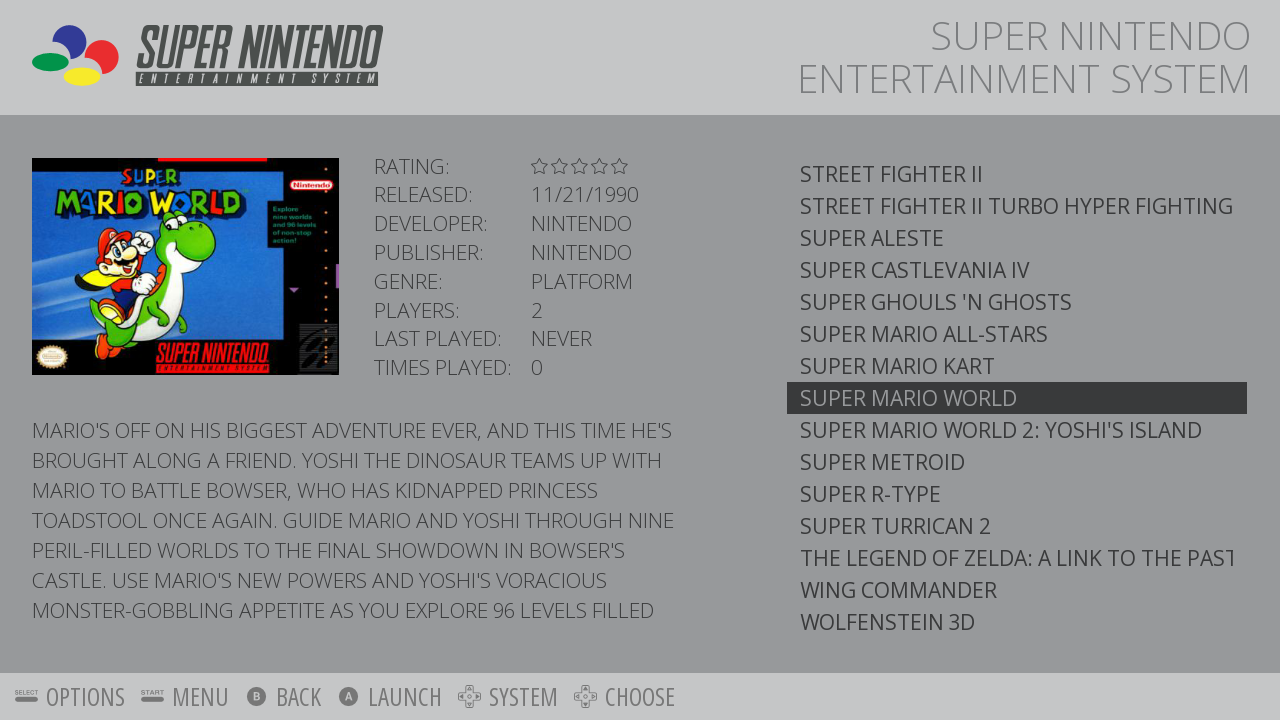
Mit RecalboxOS verwandelst du deinen Raspberry Pi 2 in eine Multi-Retro-Spielekonsole und das in nur wenigen Minuten. Spiele alte Hits wie Mario World, Zelda & Sonic auf deinem TV.
Recalbox hat hierbei gravierende Vorteile gegenüber RetroPie.
- Online Updates direkt aus dem Programm heraus
- WLAN lässt sich im Programm einrichten
- Große Treiberunterstützung für Controller
- Bluetooth-Controller Unterstützung
- Man muss keine Komandozeilenbefehle ausführen um alles zum Laufen zu bekommen
Ich habe natürlich Anfangs RetroPie benutzt, doch ist es vor allem für Anfänger nicht gerade einsteigerfreundlich. Vieles muss man noch manuell im Terminal einrichten und oftmals klappt dann irgend etwas wieder nicht, obwohl man alles strikt nach Anleitung macht.. zumindest geht es mir oft so. :/
Dann bin ich vor kurzem auf Recalbox gestoßen… Wahnsinn!! Super leichte Installation. Sehr einfache Einrichtung. Kein Stress mit Kommandozeilenbefehlen! Alles lässt sich bequem aus dem Programm heraus einstellen. Ich konnte kaum glauben dass ich bereits nach 10 Minuten mit meinem Playstation 3 Controller das erste Spiel spielen konnte.
In dieser Anleitung zeige ich dir Schritt für Schritt wie man Recalbox OS installiert und einrichtet. 🙂
Was wird benötigt?
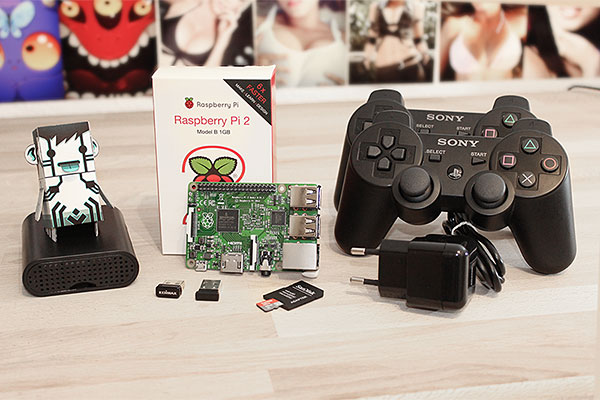
| Hardware | Empfehlung |
|---|---|
| Raspberry Pi 2 Model B | 37,90 € |
| hochwertiges Netzteil (5V, 2A) | 9,99 € |
| Micro SD-Karte (mindestens 8GB) | 6,99 € |
| WLAN-Stick oder Netzwerkkabel | 7,99 € |
| beliebiges HDMI-Kabel | 5,99 € |
| USB Gamepad Controller | ab 5,00 € |
| [Optional] kompatibler Bluetooth-Stick für PS3-Controller | 10,85 € |
| [Optional] beliebiges Gehäuse | zur Übersicht |
Zusätzlich wird für die Installation noch eine USB-Maus und Tastatur benötigt.
Die Wahl des Controllers ist dir überlassen. Soweit ich weiß werden fast alle USB Controller unterstützt. PS3 & Xbox Controller sowieso.
Ich nutze mit dem oben verlinkten Bluetooth-Stick meine beiden PS3 Dualshock Controller.
Anleitung
1. Recalbox herunterladen
Unter diesem Link findest du immer die aktuellste Version von Recalbox. Lade dir dort die „recalboxOS-vx.x.xx.zip ~ 340MB“ herunter.
Entpacke anschließend den Inhalt in einen separaten Ordner.
2. SD-Karte vorbereiten
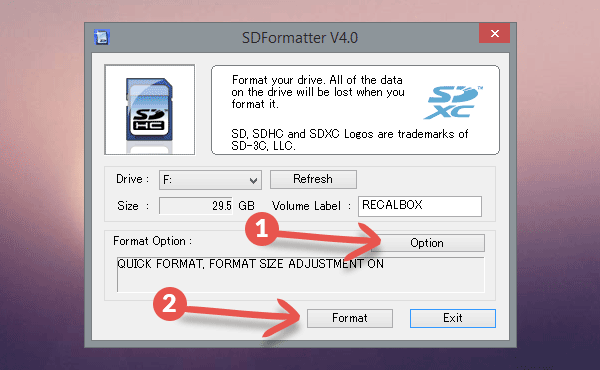
Deine SD-Karte muss in FAT32 formatiert sein. Am besten eignet sich dafür das Programm SD Formatter. (runterscrollen bis zum blauen Downloadbutton)
Installiere dieses kleine Programm und wähle deine zu formatierende SD-Karte aus.
In den Optionen stellst du dann noch den Punkt „Format size adjustment“ auf ON.
Anschließend kannst du deine Karte formatieren.
Hinweis: Falls du eine größere SD-Karte besitzt und diese sich mit dem oben erwähnten Toll nicht formatieren lässt, sollte es mit diesem Tool funktionieren.
Danke für diesen Tipp Guzilli! 🙂
3. Recalbox auf SD-Karte kopieren
Deine SD-Karte ist jetzt vorbereitet. Kopiere nun den gesamten Inhalt der zuvor heruntergeladenen zip-Datei auf deine SD-Karte.
So sieht deine fertige SD-Karte dann aus.
4. Installation am Raspberry Pi
An dieser Stelle benötigst du eine USB-Maus an deinem Raspberry Pi um den Installationsvorgang zu starten.
Wähle einfach das bereits richtig ausgewählte recalboxOS-rpi2 Image (1) aus und starte die Installation (2).
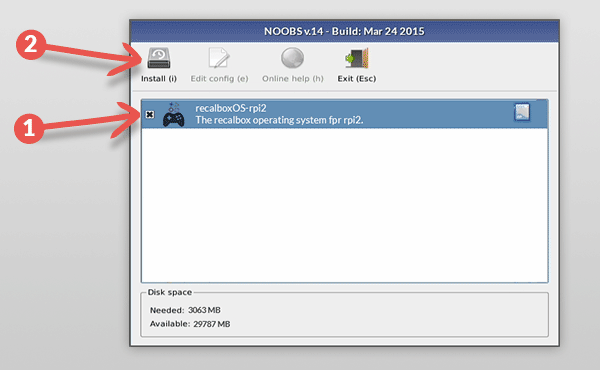
Nach abgeschlossener Installation musst du nur noch deinen Raspberry Pi 2 neu starten (Stecker rein/raus) und schon startet Recalbox OS.
5. Controller einrichten
PS3 Controller
Um deinen PS3-Controller einzubinden benötigst du diesen Bluetooth Empfänger.
Verbinde deinen PS3-Controller mit einem USB-Kabel mit dem Raspberry für ungefähr 10 Sekunden. In dieser Zeit wird dein Controller mit dem Bluetooth Stick gekoppelt.
Nun kannst du das USB-Kabel wieder ziehen und durch drücken des Playstation Knopfes dich mit dem Bluetooth Stick verbinden.
Auf diese Art und Weise kannst du auch mehrere PS3 Controller gleichzeitig betreiben. 🙂
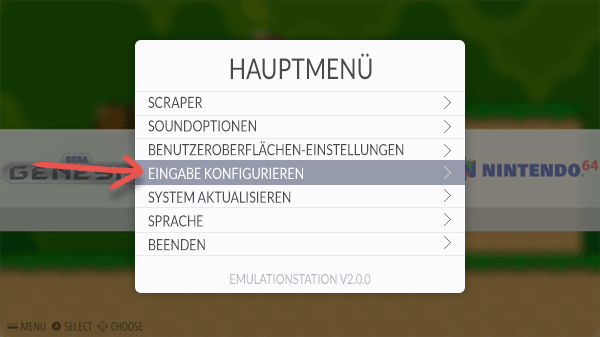
Ich empfehle dir auch gleich deinen Controller neu einzurichten über das Hauptmenü, damit du genau weißt wo sich die „Hotkey-Taste“ befindet. Das ist später sehr wichtig um aus einem laufendem Spiel wieder zurück ins Hauptmenü zu kommen. 😉
USB-Controller / Gamepad
Wie ich aus den Kommentaren erfahren habe, werden einige USB-Gamepads nicht sofort erkannt. Man muss diese zuerste konfigurieren.
Dafür benötigst du eine angeschlossene Tastatur um in Recalbox ins Eingabe-Konfigurationsmenü zu kommen.
Folgendermaßen kannst du in Recalbox mit einer Tastatur navigieren:
- Enter = Start / Hauptmenü
- Leertaste = Auswählen
- Q = Zurück
- S = OK
Drücke dann die Enter Taste um ins Hauptmenü zu kommen und anschließend führst du die Controller-Configuraiton durch indem du einfach den Anweisungen auf dem Bildschirm folgst. Jetzt stellst du deinen soeben konfigurierten Controller auf „Player 1“. Fertig.
6. Netzwerkverbindung aufbauen
Um Spiele (Roms) auf deinen Raspberry zu kopieren, benötigst du eine Netzwerkverbindung.
An dieser Stelle musst du eine Tastatur am Raspberry anschließen, um deine Netzwerkdaten eingeben zu können.
Stelle zunächst die Sprache der Benutzeroberfläche auf Deutsch. Gehe dafür ins Hauptmenü, indem du die Start-Taste auf deinem Controller drückst und anschließend auf „Language → Deutsch“. Dadurch wird auch das Tastaturlayout auf Deutsch umgestellt. Es ist ein Neustart erforderlich.
Nach dem Neustart begibst du dich wieder ins Hauptmenü und gibst deine WLAN Daten (SSID & Passwort) unter dem Punkt „Netzwerk-Einstellungen“ ein.
Achte bei der Eingabe deines Netzwerknamen (SSID) auf Groß- und Kleinschreibung.
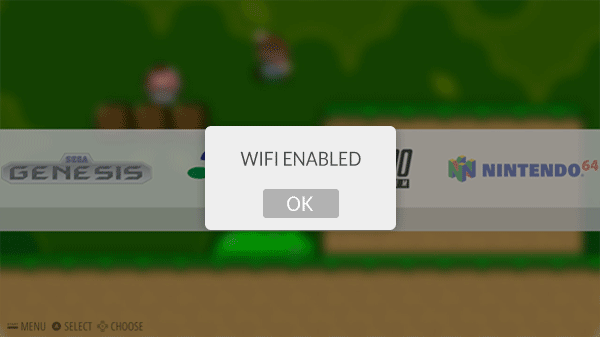
Hast du alles korrekt eingegeben, erscheint nach einigen Sekunden eine Meldung dass deine WLAN-Verbindung aktiviert wurde.
7. Spiele hinzufügen
Wo finde ich Spiele?
Man findet die Spiele ganz einfach über Google. Suchst du also z.B. Mario Kart für den Super Nintendo, dann musst du einfach nur „mario kart snes rom“ googeln und findest ganz schnell eine Seite wo du dir das Spiel herunterladen kannst.
Vorsicht! Leider sind viele solcher Rom-Seiten darauf ausgelegt, dass man den richtigen Downloadlink kaum findet und dazu verleitet wird, irgend ein „Downloadtool“ runterzuladen. Roms sind niemals .exe Dateien. Falls du eine .exe Datei herunterlädst, dann lösche sie sofort. Man muss wirklich aufpassen was man runterlädt. Zur Sicherheit sollte man das heruntergeladene Spiel einmal mit dem Virenscanner prüfen.
Bedenke dass du nur Spiele herunterladen darfst, die du auch selber im Original besitzt.
Spiele hinzufügen
Du hast jetzt Mario Kart als zip-Datei heruntergeladen. Diese musst du jetzt entpacken und erhälst dann z.B. eine Super_Mariokart_(E).smc Datei, auch Rom genannt.
Diese Datei muss jetzt auf den Raspberry Pi kopiert werden. Das geht jedoch nur, wenn du zuvor dein Netzwerk eingerichtet hast.
Wir greifen jetzt über das Netzwerk am PC auf den Raspberry zu. Das geht ganz einfach indem du in einem Windows-Fenster oben in die Adresszeile „\\RECALBOX“ eingibst. Alternativ funktioniert das natürlich auch wenn man die IP-Adresse des Raspberrys eingibt.
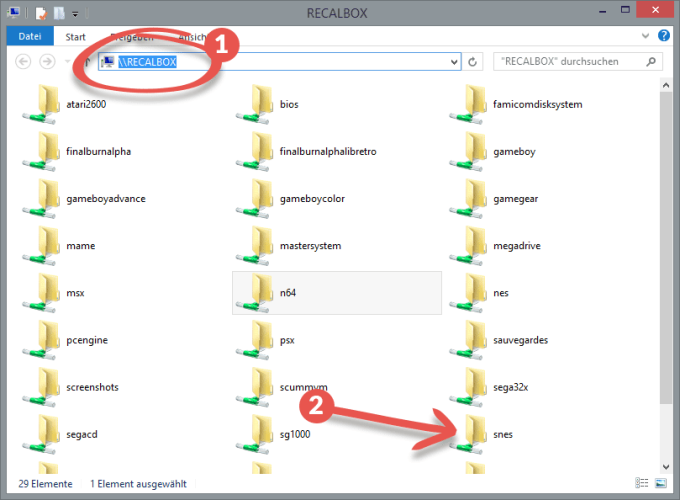
In den snes-Ordner kopierst du jetzt deine eine Super_Mariokart_(E).smc Datei. Fertig.
Zurück auf deinem Raspberry kannst du Mario Kart für den Super Nintendo starten. 🙂
8. Bedienung
Ich habe ein Spiel gestartet, wie komme ich zurück ins Menü?
Du hast gerade Mario Kart für den Super Nintendo gestartet und deine ersten Runden gedreht, du bist richtig happy dass alles bis jetzt so gut geklappt hat. Doch wie kommt man aus dem Spiel wieder raus?
Bei der Controller-Einrichtung hast du als letzte Taste die Hotkey-Taste bestimmt.
Drücke die Hotkey-Taste zusammen mit der Start-Taste um aus dem Spiel zurück ins Hauptmenü zu kommen.
Hier sind noch mal alle Hotkey Befehle zusammengefasst:
- Hotkey + Y = Spielstand speichern
- Hotkey + X = Spielstand laden
- Hotkey + Start = Spiel ohne zu speichern beenden
- Hotkey + B = Emulator Einstellungen
- Hotkey + L1 = Screenshot
- Hotkey + Rechts = Spiel beschleunigen
Mit dieser Anleitung sollte es dir jetzt möglich sein alte Spieleklassiker zurück auf deinen TV zu holen 🙂
Viel Spaß beim zocken.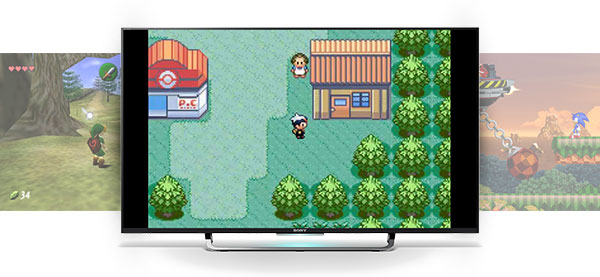
Bei mir wird der N64, PSX Emulator nicht angezeigt, was tun?
Diese Frage wird oft gestellt. Die Antwort darauf: So lange sich keine Roms (Spiele) in den entsprechenden Ordnern befinden, wird der Emulator auch noch nicht angezeigt. Erst wenn du ein Spiel z.B. im N64 Ordner hast, wird dir der N64 Emulator nach einem Neustart auch angezeigt.
Ergebnis:
Tipps und Tricks
Wie du z.B. deinen Prozessor übertaktest oder die volle Treiberunterstützung für deinen Xbox 360 Controller aktivierst, findest du in diesem Artikel:
Tipps und Tricks für RecalboxOS
Neu: Hilfe im Forum
Da hier wirklich sehr viele Fragen in den Kommentaren gestellt werden und es dadurch sehr unübersichtlich wird, habe ich auf Wunsch ein Forum aufgesetzt auf dem man sich gegenseitig besser helfen kann.









Hands down, Apple’s app store wins by a mile. It’s a huge selection of all sorts of apps vs a rather sad selection of a handful for Zune. Microsoft has plans, especially in the realm of games, but I’m not sure I’d want to bet on the future if this aspect is important to you. The iPod is a much better choice in that case.
store wins by a mile.
Apple now has Rhapsody as an app, which is a great start, but it is currently hampered by the inability to store locally on your iPod, and has a dismal 64kbps bit rate. If this changes, then it will somewhat negate this advantage for the Zune, but the 10 songs per month will still be a big plus in Zune Pass‘ favor.
which is a great start
This is getting a bit more subjective, but I much prefer the Zune Marketplace. The interface is colorful, has more flair, and some cool features like ‚Mixview‘ that let you quickly see related albums, songs, or other users related to what you’re listening to. Clicking on one of those will center on that item, and another set of „neighbors“ will come into view, allowing you to navigate around exploring by similar artists, songs, or users. Speaking of users, the Zune „Social“ is also great fun, letting you find others with shared tastes and becoming friends with them. You then can listen to a playlist created based on an amalgamation of what all your friends are listening to, which is also enjoyable. Those concerned with privacy will be relieved to know you can prevent the public from seeing your personal listening habits if you so choose.
I’ll gear this review to 2 types of people: current Zune owners who are considering an upgrade, and people trying to decide between a Zune and an iPod. (There are other players worth considering out there, like the Sony Walkman X, but I hope this gives you enough info to make an informed decision of the Zune vs players other than the iPod line as well.)
If you’re still on the fence: grab your favorite earphones, head down to a Best Buy and ask to plug them into a Zune then an iPod and see which one sounds better to you, and which interface makes you smile more. Then you’ll know which is right for you.
If you’re still on the fence: grab your favorite earphones, head down to a Best Buy and ask to plug them into a Zune then an iPod and see which one sounds better to you, and which interface makes you smile more. Then you’ll know which is right for you.
Apple now has Rhapsody as an app, which is a great start, but it is currently hampered by the inability to store locally on your iPod, and has a dismal 64kbps bit rate. If this changes, then it will somewhat negate this advantage for the Zune, but the 10 songs per month will still be a big plus in Zune Pass‘ favor.
This is getting a bit more subjective, but I much prefer the Zune Marketplace. The interface is colorful, has more flair, and some cool features like ‚Mixview‘ that let you quickly see related albums, songs, or other users related to what you’re listening to. Clicking on one of those will center on that item, and another set of „neighbors“ will come into view, allowing you to navigate around exploring by similar artists, songs, or users. Speaking of users, the Zune „Social“ is also great fun, letting you find others with shared tastes and becoming friends with them. You then can listen to a playlist created based on an amalgamation of what all your friends are listening to, which is also enjoyable. Those concerned with privacy will be relieved to know you can prevent the public from seeing your personal listening habits if you so choose.
This is getting a bit more subjective, but I much prefer the Zune Marketplace. The interface is colorful, has more flair, and some cool features like ‚Mixview‘ that let you quickly see related albums, songs, or other users related to what you’re listening to. Clicking on one of those will center on that item, and another set of „neighbors“ will come into view, allowing you to navigate around exploring by similar artists, songs, or users. Speaking of users, the Zune „Social“ is also great fun, letting you find others with shared tastes and becoming friends with them. You then can listen to a playlist created based on an amalgamation of what all your friends are listening to, which is also enjoyable. Those concerned with privacy will be relieved to know you can prevent the public from seeing your personal listening habits if you so choose.
Zune and iPod: Most people compare the Zune to the Touch, but after seeing how slim and surprisingly small and light it is, I consider it to be a rather unique hybrid that combines qualities of both the Touch and the Nano. It’s very colorful and lovely OLED screen is slightly smaller than the touch screen, but the player itself feels quite a bit smaller and lighter. It weighs about 2/3 as much, and is noticeably smaller in width and height, while being just a hair thicker.
Apple now has Rhapsody as an app, which is a great start, but it is currently hampered by the inability to store locally on your iPod, and has a dismal 64kbps bit rate. If this changes, then it will somewhat negate this advantage for the Zune, but the 10 songs per month will still be a big plus in Zune Pass‘ favor.
I’ll gear this review to 2 types of people: current Zune owners who are considering an upgrade, and people trying to decide between a Zune and an iPod. (There are other players worth considering out there, like the Sony Walkman X, but I hope this gives you enough info to make an informed decision of the Zune vs players other than the iPod line as well.)
Zune and iPod: Most people compare the Zune to the Touch, but after seeing how slim and surprisingly small and light it is, I consider it to be a rather unique hybrid that combines qualities of both the Touch and the Nano. It’s very colorful and lovely OLED screen is slightly smaller than the touch screen, but the player itself feels quite a bit smaller and lighter. It weighs about 2/3 as much, and is noticeably smaller in width and height, while being just a hair thicker.
Hands down, Apple’s app store wins by a mile. It’s a huge selection of all sorts of apps vs a rather sad selection of a handful for Zune. Microsoft has plans, especially in the realm of games, but I’m not sure I’d want to bet on the future if this aspect is important to you. The iPod is a much better choice in that case.
I’ll gear this review to 2 types of people: current Zune owners who are considering an upgrade, and people trying to decide between a Zune and an iPod. (There are other players worth considering out there, like the Sony Walkman X, but I hope this gives you enough info to make an informed decision of the Zune vs players other than the iPod line as well.)
If you’re still on the fence: grab your favorite earphones, head down to a Best Buy and ask to plug them into a Zune then an iPod and see which one sounds better to you, and which interface makes you smile more. Then you’ll know which is right for you.
you have a good site
go0d post, I like it
so useful thanks
so special!!!
this is great , kepp going sir
how to do this? send me your fb
Retro Games sind echt Top.
Raspberry Pi 2 Model B wurde gekauft
Retro das Liebe ich einfach.
thank you sir
That was awesome
Great
Good luck
Hi Good day – Looking forward to visit more. I am thankful for the article post
it was a good story
you have a good site
great post, thanks
Hello
I saved this page and will come again
I enjoyed this part, thank you
Thankful
you have an amazing site tnx
it was good story
you have a good site
thanks that was a good page.
درمان و لیزر بیماری بواسیر با بهترین قیمت و کادری حرفه ای در تهران
خرید و فروش شرکت
that was useful.