Diese Anleitung hat es in sich! In diesem Artikel zeige ich dir wie du deine Fernbedienung in Kodi einrichtest und wie du jede Taste nach deinen eigenen Vorstellungen belegst.
Via Tastendruck im laufenden Video die Sprache wechseln oder die Untertitel ein bzw. ausblenden? Das und noch vieles mehr wirst du nach dieser Anleitung mit deiner Fernbedienung steuern können. 🙂
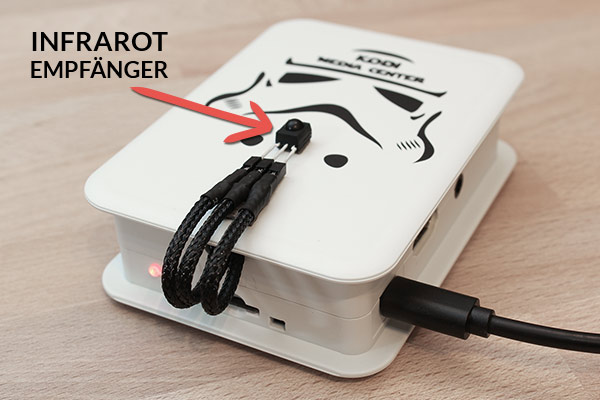
Falls du noch keinen IR-Empfänger am Raspberry Pi 2 installiert hast, findest du hier nochmal den ersten Teil dazu:
Teil 1: So installierst du einen Highend-Infrarot Empfänger am Raspberry Pi 2
Diese Anleitung bezieht sich auf Openelec. Ich kann darum nicht versprechen dass es bei anderen Betriebssystemen genau so funktioniert.
Als Fernbedienung nehme ich meine beliebte Xbox One Media Remote. Wer noch eine richtig gute Fernbedienung sucht ist damit sehr gut bedient. 🙂
Für Anfänger mag diese Anleitung vielleicht kompliziert wirken aber ich versuche alles sehr ausführlich zu erklären damit auch wirklich Jeder damit arbeiten kann.
Als Hardware verwende ich hier, wie immer, einen Raspberry Pi 2.
Legen wir los, yeehaa.
1. Vorbereitung
Wir werden die komplette Einrichtung im Terminal vornehmen. Wir verbinden uns also mit einem Programm Namens Putty mit dem Raspberry und geben dort alle Befehle ein.
Lade dir Putty von hier herunter:
Eine Installation ist nicht Notwendig, einfach die putty.exe starten.
Nachdem du Putty gestartet hast, musst du dort nur noch die IP-Adresse von deinem Pi eingeben. Diese findest du in Kodi im Untermenü „Systeminfo“ unter „Optionen„. Hier ein Screenshot.
Nun geben wir die IP-Adresse ein und öffnen das Terminal.
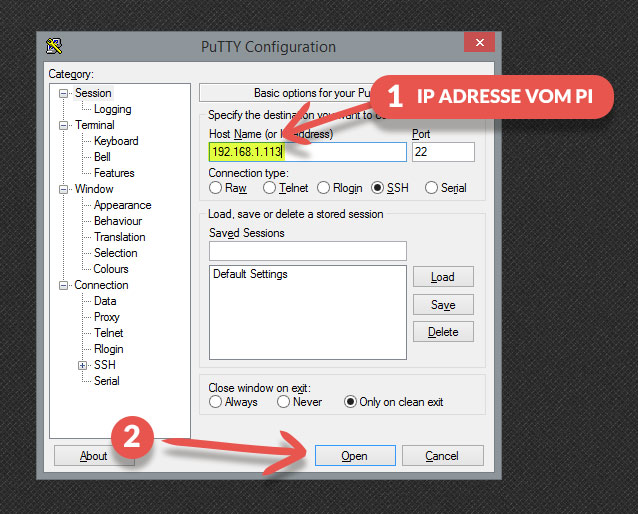
Danach melden wir uns mit Benutzername „root“ und dem Passwort „openelec“ auf dem Raspberry an.
Anmerkung: Bei der Eingabe des Passwortes wirst du keine Eingabe sehen, also nicht wundern dass deine Eingabe sich dort nicht zeigt. Einfach das Passwort eingeben und dann mit Enter bestätigen.

Nach erfolgreicher Anmeldung bist du mit dem Raspberry Pi verbunden und kannst ihm Befehle geben und auf alles zugreifen.
2. Lirc Modul aktivieren
Lirc (Linux Infrared Remote Control) ist ein Programm, dass Infrarot Signale in Programmbefehle umsetzt.
Dieses Modul müssen wir zuerst auf dem Raspberry Pi 2 aktivieren. Dafür brauchen wir nur den Eintrag „dtoverlay=lirc-rpi“ in die config.txt schreiben.
Dies führen wir im Terminal aus. Gib folgende Zeile im Terminal ein und bestätige mit Enter.
mount -o remount,rw /flash
Damit können wir auf die Partition zugreifen auf der die config.txt liegt.
Als nächstes öffnen wir die config.txt wo wir ganz am Ende den Eintrag „dtoverlay=lirc-rpi“ schreiben (Mit den Pfeiltasten ganz nach unten gehen).
nano /flash/config.txt
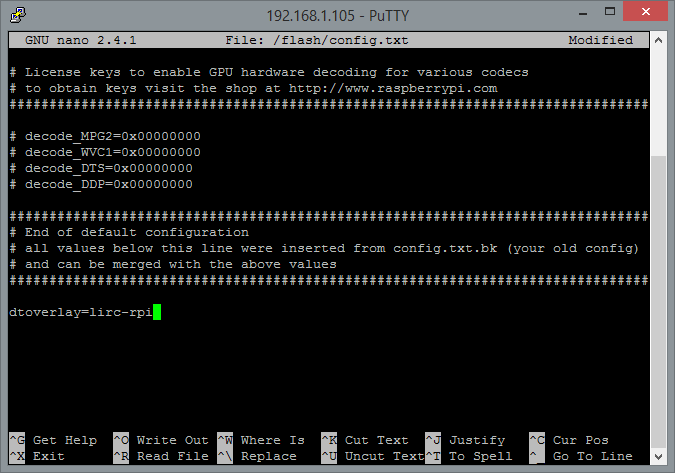
Danach drückst du STRG+O um die Datei zu speichern und mit STRG+X verlässt du diesen Editor wieder.
Anschließend den Pi neu starten (mit dem Befehl „reboot“ oder einfach Stecker ziehen) damit die Änderungen übernommen werden und danach wieder mit Putty neu verbinden um mit dem nächsten Schritt weiterzumachen.
3. Tasten aufzeichnen
Jetzt werden wir alle Tasten aufzeichnen.
Als erstes müssen wir den aktiven Lirc Prozess stoppen damit wir die Aufzeichnungsfunktion nutzen können. Dafür folgenden Befehl im Terminal eingeben und mit Enter bestätigen:
killall lircd
Nun können wir mit der Aufzeichnung beginnen. Mit diesem Befehl starten wir den Prozess und erstellen eine lircd.conf Datei wo am Ende der Aufzeichnung alle Parameter gespeichert werden:
irrecord /storage/.config/lircd.conf
Nach dieser Eingabe startet das Aufzeichnungsprogramm und führt dich Schritt für Schritt durch alle notwendigen Punkte um deine Tasten aufzuzeichnen.
Den ersten Dialog Dialog können wir mit Enter bestätigen.
Im nächsten Dialog beginnt dann auch schon die Schritt-für-Schritt Anleitung. Hier wird kurz erklärt was man im nächsten Schritt machen soll nach dem man mit Enter bestätigt hat.
Als erstes muss Lirc die Frequenzbreite deiner Fernbedienung bestimmen. Dafür musst du möglichst viele Tasten – wild durcheinander, ohne System – jeweils 1 Sekunde lang drücken bis Lirc genug Informationen gesammelt hat.
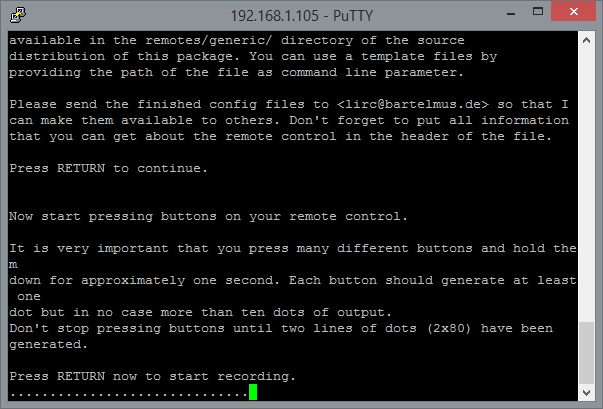
Es wird eine kurze Zwischenmeldung erscheinen wo deine ermittelte Frequenz angezeigt wird und du wirst dann gebeten weiterhin beliebige Tasten auf deiner Fernbedienung zu drücken.
Nach dem wir das abgeschlossen haben beginnt die Tastenzuweisung.
Es beginnt immer damit, dass du zuerst den Namen der Taste eingibst und anschließend diese Taste auf deiner Fernbedienung gedrückt hältst bis sie erkannt wurde.
Bei der Benennung der Tasten musst du aber aufpassen. Du darfst dir hierbei keinen Namen ausdenken. Der Name muss immer mit „KEY_“ beginnen. Hier habe ich dir eine Liste erstellt mit Namen die erlaubt sind. Im Prinzip ist es nur wichtig dass zum Schluss jede Taste einen Namen hat. Die Funktion da hinter können wir dann anpassen wie wir wollen. Aber der Übersicht halber sollte man schon passende Namen wählen.
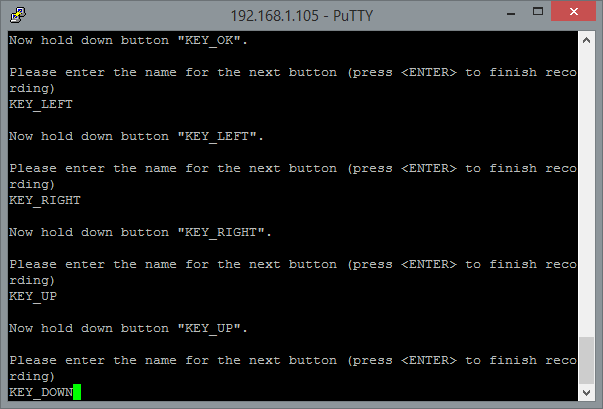
Nachdem man jeder Taste einen Namen gegeben hat bestätigt man mit Enter und ist dann fertig mit dem erstellen seiner lircd.conf Datei.
Diese Datei findet man, wenn man im Netzwerk auf den Pi zugreift, im Configfiles Ordner.
So sieht die Datei von meiner Xbox Fernbedienung nach dem aufzeichnen aus: lircd.conf
Falls ein Name ungünstig gewählt wurde, kann man mit einem Editor Korrekturen an der Datei vornehmen. Aber bitte an die Namensgebung halten.
Wenn du auch die Xbox One Fernbedienung besitzt kannst du einfach meine Datei übernehmen und sparst dir diesen kompletten Schritt mit der Erkennung. 🙂
Zur Sicherheit sollte man jetzt wieder einen Neustart durchführen damit der Lirc Prozess wieder läuft und die neu erstellte lircd.conf benutzt wird.
Kurzer Funktionstest
Im Terminal kann man mit folgendem Befehl testen ob die Tastenzuweisung funktioniert:
irw
Wenn du jetzt mit deiner Fernbedienung ein paar Tasten drückst solltest du im Terminal den Namen der gedrückten Taste sehen. Mit STRG+C kommst du aus diesem Modus wieder raus.
4. Lirc mit Kodi verbinden
Dank Lirc hat jetzt jede Taste zwar einen Namen aber Kodi kann damit noch nichts anfangen. Den Vermittler zwischen Kodi und Lirc spielt die Lircmap.xml Datei.
Diese Datei verbindet die Tasten der Fernbedienung mit den Funktionen von Kodi.
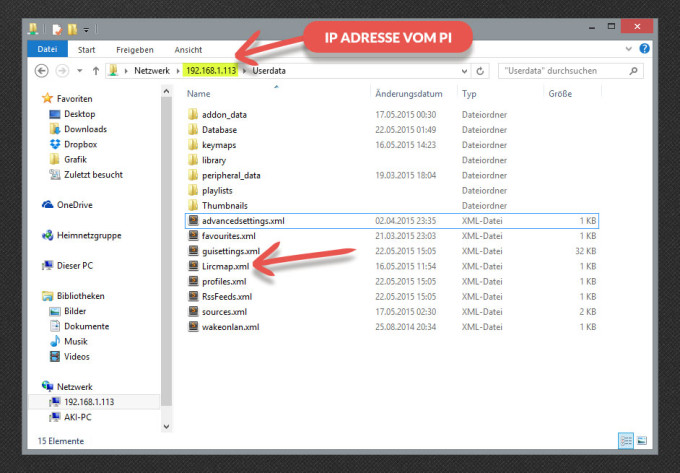
Die Lircmap.xml Datei muss neu erstellt werden und muss im Userdata Ordner von Kodi abgelegt werden.
Die IP-Adresse musst du in dieser Schreibweise eingeben –> \\192.168.1.111\
Wenn du nur die IP-Adresse ohne Backslash schreibst, öffnet sich dein Internetbrowser. 😉
So sieht z.B. die fertige Lircmap.xml von meiner Xbox One Fernbedienung aus: Lircmap.xml (Rechtsklick –> Ziel speichern unter)
Falls du noch keinen vernünftigen Texteditor nutzt, empfehle ich dir Notepad++ oder Sublime Text 3 zu nutzen um solche XML Dateien zu bearbeiten.
Falls du keine Lircmap.xml anlegst, nutzt Kodi eine Globale Lircmap.xml. Wenn du deinen Tasten also bereits richtige Namen gegeben hast, wird die Fernbedienung bereits funktionieren.
Damit wir aber die volle Kontrolle haben legen wir eine eigene Lircmap.xml an.
So sieht also die fertige Datei für meine Xbox One Fernbedienung aus:
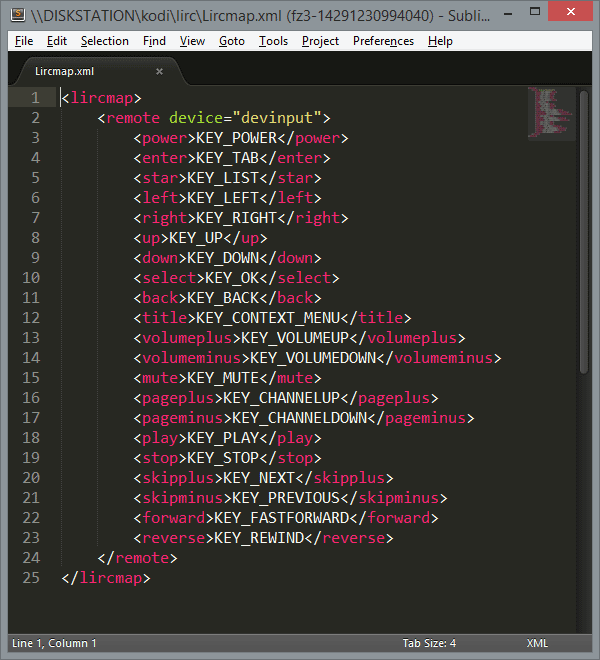
Du musst jeder deiner Tasten eine Funktion zuweisen. Alle möglichen Funktionen habe ich dir auf dieser Seite aufgelistet.
Eine Fernbedienung hat natürlich auch einige Sondertasten. Ich habe z.B. der Taste „KEY_LIST“ die Funktion „star“ zugewiesen. Ich möchte dass später bei dieser Taste mein Favoritenmenü aufgeht. Das wird vorerst nicht funktionieren aber später weisen wir „star“ die entsprechende Funktion zu. Was die Grundfunktion von „star“ in Kodi ist, weiß ich gerade auch gar nicht aber der Name bietet sich für das Favoritenmenü an. 🙂
Nachdem das geschafft ist, startest du Kodi neu und dann sollte die Bedienung auch bereits ganz gut funktionieren.
5. Individuelle Anpassungen vornehmen
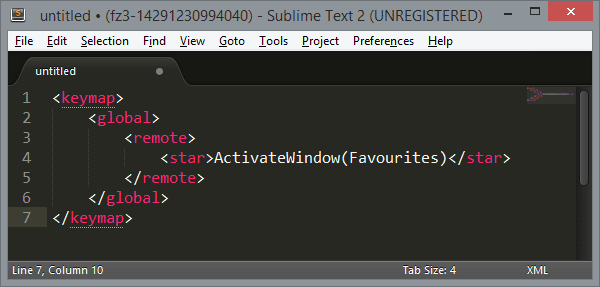
Kommen wir nun zum Feintuning. Wie ich bereits oben geschrieben habe möchte ich, dass beim drücken der Taste „KEY_LIST„, welche ich in der Lircmap.xml die Funktion „star“ gegeben habe, das Favoritenmenü geöffnet wird.
Für solche Anpassungen brauchen wir eine weitere Datei namens remote.xml. Diese muss hier abgelegt werden: Userdata → keymaps
Auf dieser Kodi-Wiki Seite schauen wir nach wie der Befehl für das öffnen des Favoritenmenüs heißt und ändern die Funktion von „star“.
Die fertige remote.xml mit dieser Anpassung sieht dann folgendermaßen aus:
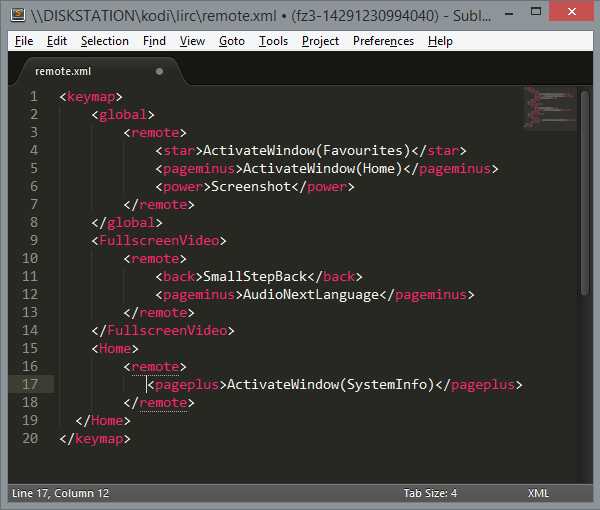
Ich habe bei meiner Fernbedienung natürlich noch weitere Anpassungen gemacht. Meine finale remote.xml sieht so aus:
Und hier noch ein Downloadlink: remote.xml (Rechtsklick –> Ziel speichern unter)
Man sieht in meiner Datei erst mal 3 verschiedene Bereiche: global, FullscreenVideo und Home.
Alles was in <global> steht wird überall ausgeführt. Egal wo man sich in Kodi befindet.
Alles was in <FullscreenVideo> steht funktioniert nur wenn gerade ein Video im Vollbild läuft.
Alles was in <Home> steht funktioniert nur wenn man sich im Hauptmenü befindet.
Wer mehr über den Aufbau erfahren möchte kann sich hier einlesen.
Diese Möglichkeit ist ideal um einer Taste viele verschiedene Funktionen zuzuweisen, je nachdem wo man sich gerade in Kodi befindet. Das habe ich bei meiner Taste „pageminus“ gemacht. Beim drücken dieser Taste komme ich sofort ins Hauptmenü. Wenn aber ein Video läuft dann wird beim drücken dieser Taste die Audiospur gewechselt. Von deutsch auf englisch z.B..
Meiner Powertaste habe ich die Screenshotfunktion zugewiesen um jederzeit einen Screenshot in Kodi machen zu können. Sehr praktisch für meinen Blog. 😉
Nun sollte es dir Möglich sein jede deiner Tasten nach deinen Wünschen einzustellen. Bei Fragen oder Problemen helfe ich dir in den Kommentaren gerne weiter.









Hands down, Apple’s app store wins by a mile. It’s a huge selection of all sorts of apps vs a rather sad selection of a handful for Zune. Microsoft has plans, especially in the realm of games, but I’m not sure I’d want to bet on the future if this aspect is important to you. The iPod is a much better choice in that case.
Hands down, Apple’s app store wins by a mile. It’s a huge selection of all sorts of apps vs a rather sad selection of a handful for Zune. Microsoft has plans, especially in the realm of games, but I’m not sure I’d want to bet on the future if this aspect is important to you. The iPod is a much better choice in that case.
Apple now has Rhapsody as an app, which is a great start, but it is currently hampered by the inability to store locally on your iPod, and has a dismal 64kbps bit rate. If this changes, then it will somewhat negate this advantage for the Zune, but the 10 songs per month will still be a big plus in Zune Pass‘ favor.
Hands down, Apple’s app store wins by a mile. It’s a huge selection of all sorts of apps vs a rather sad selection of a handful for Zune. Microsoft has plans, especially in the realm of games, but I’m not sure I’d want to bet on the future if this aspect is important to you. The iPod is a much better choice in that case.
This is getting a bit more subjective, but I much prefer the Zune Marketplace. The interface is colorful, has more flair, and some cool features like ‚Mixview‘ that let you quickly see related albums, songs, or other users related to what you’re listening to. Clicking on one of those will center on that item, and another set of „neighbors“ will come into view, allowing you to navigate around exploring by similar artists, songs, or users. Speaking of users, the Zune „Social“ is also great fun, letting you find others with shared tastes and becoming friends with them. You then can listen to a playlist created based on an amalgamation of what all your friends are listening to, which is also enjoyable. Those concerned with privacy will be relieved to know you can prevent the public from seeing your personal listening habits if you so choose.
I’ll gear this review to 2 types of people: current Zune owners who are considering an upgrade, and people trying to decide between a Zune and an iPod. (There are other players worth considering out there, like the Sony Walkman X, but I hope this gives you enough info to make an informed decision of the Zune vs players other than the iPod line as well.)
Zune and iPod: Most people compare the Zune to the Touch, but after seeing how slim and surprisingly small and light it is, I consider it to be a rather unique hybrid that combines qualities of both the Touch and the Nano. It’s very colorful and lovely OLED screen is slightly smaller than the touch screen, but the player itself feels quite a bit smaller and lighter. It weighs about 2/3 as much, and is noticeably smaller in width and height, while being just a hair thicker.
Hands down, Apple’s app store wins by a mile. It’s a huge selection of all sorts of apps vs a rather sad selection of a handful for Zune. Microsoft has plans, especially in the realm of games, but I’m not sure I’d want to bet on the future if this aspect is important to you. The iPod is a much better choice in that case.
Zune and iPod: Most people compare the Zune to the Touch, but after seeing how slim and surprisingly small and light it is, I consider it to be a rather unique hybrid that combines qualities of both the Touch and the Nano. It’s very colorful and lovely OLED screen is slightly smaller than the touch screen, but the player itself feels quite a bit smaller and lighter. It weighs about 2/3 as much, and is noticeably smaller in width and height, while being just a hair thicker.
Zune and iPod: Most people compare the Zune to the Touch, but after seeing how slim and surprisingly small and light it is, I consider it to be a rather unique hybrid that combines qualities of both the Touch and the Nano. It’s very colorful and lovely OLED screen is slightly smaller than the touch screen, but the player itself feels quite a bit smaller and lighter. It weighs about 2/3 as much, and is noticeably smaller in width and height, while being just a hair thicker.
I’ll gear this review to 2 types of people: current Zune owners who are considering an upgrade, and people trying to decide between a Zune and an iPod. (There are other players worth considering out there, like the Sony Walkman X, but I hope this gives you enough info to make an informed decision of the Zune vs players other than the iPod line as well.)
This is getting a bit more subjective, but I much prefer the Zune Marketplace. The interface is colorful, has more flair, and some cool features like ‚Mixview‘ that let you quickly see related albums, songs, or other users related to what you’re listening to. Clicking on one of those will center on that item, and another set of „neighbors“ will come into view, allowing you to navigate around exploring by similar artists, songs, or users. Speaking of users, the Zune „Social“ is also great fun, letting you find others with shared tastes and becoming friends with them. You then can listen to a playlist created based on an amalgamation of what all your friends are listening to, which is also enjoyable. Those concerned with privacy will be relieved to know you can prevent the public from seeing your personal listening habits if you so choose.
I’ll gear this review to 2 types of people: current Zune owners who are considering an upgrade, and people trying to decide between a Zune and an iPod. (There are other players worth considering out there, like the Sony Walkman X, but I hope this gives you enough info to make an informed decision of the Zune vs players other than the iPod line as well.)
If you’re still on the fence: grab your favorite earphones, head down to a Best Buy and ask to plug them into a Zune then an iPod and see which one sounds better to you, and which interface makes you smile more. Then you’ll know which is right for you.
Zune and iPod: Most people compare the Zune to the Touch, but after seeing how slim and surprisingly small and light it is, I consider it to be a rather unique hybrid that combines qualities of both the Touch and the Nano. It’s very colorful and lovely OLED screen is slightly smaller than the touch screen, but the player itself feels quite a bit smaller and lighter. It weighs about 2/3 as much, and is noticeably smaller in width and height, while being just a hair thicker.
Apple now has Rhapsody as an app, which is a great start, but it is currently hampered by the inability to store locally on your iPod, and has a dismal 64kbps bit rate. If this changes, then it will somewhat negate this advantage for the Zune, but the 10 songs per month will still be a big plus in Zune Pass‘ favor.
Zune and iPod: Most people compare the Zune to the Touch, but after seeing how slim and surprisingly small and light it is, I consider it to be a rather unique hybrid that combines qualities of both the Touch and the Nano. It’s very colorful and lovely OLED screen is slightly smaller than the touch screen, but the player itself feels quite a bit smaller and lighter. It weighs about 2/3 as much, and is noticeably smaller in width and height, while being just a hair thicker.
If you’re still on the fence: grab your favorite earphones, head down to a Best Buy and ask to plug them into a Zune then an iPod and see which one sounds better to you, and which interface makes you smile more. Then you’ll know which is right for you.
I’ll gear this review to 2 types of people: current Zune owners who are considering an upgrade, and people trying to decide between a Zune and an iPod. (There are other players worth considering out there, like the Sony Walkman X, but I hope this gives you enough info to make an informed decision of the Zune vs players other than the iPod line as well.)
Zune and iPod: Most people compare the Zune to the Touch, but after seeing how slim and surprisingly small and light it is, I consider it to be a rather unique hybrid that combines qualities of both the Touch and the Nano. It’s very colorful and lovely OLED screen is slightly smaller than the touch screen, but the player itself feels quite a bit smaller and lighter. It weighs about 2/3 as much, and is noticeably smaller in width and height, while being just a hair thicker.
If you’re still on the fence: grab your favorite earphones, head down to a Best Buy and ask to plug them into a Zune then an iPod and see which one sounds better to you, and which interface makes you smile more. Then you’ll know which is right for you.
This is getting a bit more subjective, but I much prefer the Zune Marketplace. The interface is colorful, has more flair, and some cool features like ‚Mixview‘ that let you quickly see related albums, songs, or other users related to what you’re listening to. Clicking on one of those will center on that item, and another set of „neighbors“ will come into view, allowing you to navigate around exploring by similar artists, songs, or users. Speaking of users, the Zune „Social“ is also great fun, letting you find others with shared tastes and becoming friends with them. You then can listen to a playlist created based on an amalgamation of what all your friends are listening to, which is also enjoyable. Those concerned with privacy will be relieved to know you can prevent the public from seeing your personal listening habits if you so choose.
Zune and iPod: Most people compare the Zune to the Touch, but after seeing how slim and surprisingly small and light it is, I consider it to be a rather unique hybrid that combines qualities of both the Touch and the Nano. It’s very colorful and lovely OLED screen is slightly smaller than the touch screen, but the player itself feels quite a bit smaller and lighter. It weighs about 2/3 as much, and is noticeably smaller in width and height, while being just a hair thicker.
Apple now has Rhapsody as an app, which is a great start, but it is currently hampered by the inability to store locally on your iPod, and has a dismal 64kbps bit rate. If this changes, then it will somewhat negate this advantage for the Zune, but the 10 songs per month will still be a big plus in Zune Pass‘ favor.
This is getting a bit more subjective, but I much prefer the Zune Marketplace. The interface is colorful, has more flair, and some cool features like ‚Mixview‘ that let you quickly see related albums, songs, or other users related to what you’re listening to. Clicking on one of those will center on that item, and another set of „neighbors“ will come into view, allowing you to navigate around exploring by similar artists, songs, or users. Speaking of users, the Zune „Social“ is also great fun, letting you find others with shared tastes and becoming friends with them. You then can listen to a playlist created based on an amalgamation of what all your friends are listening to, which is also enjoyable. Those concerned with privacy will be relieved to know you can prevent the public from seeing your personal listening habits if you so choose.
If you’re still on the fence: grab your favorite earphones, head down to a Best Buy and ask to plug them into a Zune then an iPod and see which one sounds better to you, and which interface makes you smile more. Then you’ll know which is right for you.
This is getting a bit more subjective, but I much prefer the Zune Marketplace. The interface is colorful, has more flair, and some cool features like ‚Mixview‘ that let you quickly see related albums, songs, or other users related to what you’re listening to. Clicking on one of those will center on that item, and another set of „neighbors“ will come into view, allowing you to navigate around exploring by similar artists, songs, or users. Speaking of users, the Zune „Social“ is also great fun, letting you find others with shared tastes and becoming friends with them. You then can listen to a playlist created based on an amalgamation of what all your friends are listening to, which is also enjoyable. Those concerned with privacy will be relieved to know you can prevent the public from seeing your personal listening habits if you so choose.
Hands down, Apple’s app store wins by a mile. It’s a huge selection of all sorts of apps vs a rather sad selection of a handful for Zune. Microsoft has plans, especially in the realm of games, but I’m not sure I’d want to bet on the future if this aspect is important to you. The iPod is a much better choice in that case.
Zune and iPod: Most people compare the Zune to the Touch, but after seeing how slim and surprisingly small and light it is, I consider it to be a rather unique hybrid that combines qualities of both the Touch and the Nano. It’s very colorful and lovely OLED screen is slightly smaller than the touch screen, but the player itself feels quite a bit smaller and lighter. It weighs about 2/3 as much, and is noticeably smaller in width and height, while being just a hair thicker.
Zune and iPod: Most people compare the Zune to the Touch, but after seeing how slim and surprisingly small and light it is, I consider it to be a rather unique hybrid that combines qualities of both the Touch and the Nano. It’s very colorful and lovely OLED screen is slightly smaller than the touch screen, but the player itself feels quite a bit smaller and lighter. It weighs about 2/3 as much, and is noticeably smaller in width and height, while being just a hair thicker.
I’ll gear this review to 2 types of people: current Zune owners who are considering an upgrade, and people trying to decide between a Zune and an iPod. (There are other players worth considering out there, like the Sony Walkman X, but I hope this gives you enough info to make an informed decision of the Zune vs players other than the iPod line as well.)
Hands down, Apple’s app store wins by a mile. It’s a huge selection of all sorts of apps vs a rather sad selection of a handful for Zune. Microsoft has plans, especially in the realm of games, but I’m not sure I’d want to bet on the future if this aspect is important to you. The iPod is a much better choice in that case.
Hi ich hoffe ich werde unter drm ganzen Spam gelesen^^
Ist es möglich mit diesem IR Empfänger und der Fernbedienung den Pi herunter zu fahren, also so als wenn man ein RemotePi board verbaut?
Hallo.
Ich konnte schon sehr viel über deine Tutorials erreichen und möchte mich dafür bedanken!
Jetzt hab ich aber ein Problem mit dem „lirc einrichten“ Tuto.
Der rasbpi (3!) wurde nach Anleitung verkabelt. Dann komme ich bis zur Frequenzbestimmung der Fernbedienung, wobei er nix findet. Hab auch mehrere Fernbedienungen versucht.
Ist evtl. die Jumperzuweisung beim rpi3 anders als beim rpi2, auf den das Tutorial ja eigentlich zugeschnitten ist?
Oder wo könnte ich noch den Fehler suchen…?
Danke dir!!
Hallo
Das ist eine Super Anleitung. Damit habe ich die Fernbedienung auf wunderbar zum laufen gebracht.
Nun wollte ich die 18er Alpha installieren.
Dabei habe ich festgestellt, das die Dateien zwar noch vorhanden sind mit dem richtigen Inhalt, aber die Fernbedienung funktioniert nicht mehr
Hast Du da eine Idee was ich noch einstellen muss?
Gruß Uwe
Willst du etwas Neues? Sieh dir diese Seite an. Nur hier die Auswahl der Madchen fur jeden Geschmack und vollig kostenlos! Sie sind gehorsame Sklaven, sie werden alles tun, was du sagst!
http://gov.shortcm.li/kings1#P55
hallo zusammen. Geiler Blog. Nun stehe ich vor der letzten Hürde und komme einfach nicht weiter. Den IR Empfänger habe ich angesteckt und alles weiter wie in der Anleitung beschrieben, vorgegangen. Jedoch hatte ich nichtmal im Ordner Userdata->keymaps auch nur Ansatzweise eine Datei. Bin echt am verzweifeln, da ich das Ambilight gerne nur bei Bedarf anschalten will. Kann mir wer helfen?
Ich bin mittlerweile fündig geworden bei den kodinerds
in der config.txt muss dtoverlay=gpio-ir statt dtoverlay=lirc-rpi eingetragen werden
auch nachzulesen unter https://libreelec.wiki/infrared_remotes
Hi Uwe. Wie könnte ich mit dir Kontakt aufnehmen? Facebook?
Hallo,
als erstes mal vielen Dank für die Anleitungen. Das ist echt Super und es funktioniert alles ganz toll.
Heute habe ich aber bei Openelec ein Update gemacht und danach ging die Fernbedienung leider nicht mehr. Kannst du eventuell was da zu sagen? Hattest du den Fehler auch schon mal?
Bin irgendwie Ratlos.
Gruß Jens
Für alle die sich wundern das der IR-Empfänger aber LibreELEC 9 nicht mehr funktioniert.
Der Befehl „dtoverlay=lirc-rpi“ in der „/flash/config.txt“ hat sich in: „dtoverlay=gpio-ir“ geändert.
Kann hier nachgelesen werden.
https://wiki.libreelec.tv/infrared_remotes